If you need a clear, collaborative way to show who does what in a process—and exactly where handoffs happen—swimlane flowcharts are your best friend. In this complete tutorial, you’ll learn how to build professional swimlane diagrams in ProcessOn, collaborate with your team, export clean deliverables, and troubleshoot common hiccups.
What you’ll be able to do by the end:
- Set up pools and lanes for roles or departments
- Map steps and cross-lane handoffs with tidy connectors
- Collaborate in real time and manage sharing/versions
- Export sharp diagrams for presentations or print
- Apply best practices and fix layout/connector issues quickly
1) Swimlane Fundamentals (The 2-Minute Primer)
A swimlane diagram (often called a cross-functional flowchart) organizes process steps into horizontal “lanes,” typically one lane per role or department. This makes accountability and handoffs obvious at a glance. For a neutral overview of what swimlanes are and why they help clarify responsibilities and reduce bottlenecks, see the concise explainer in the Atlassian swimlane overview (2025).
A quick note on pools vs. lanes, using BPMN terms: a Pool represents a participant (an organization or major system), and Lanes subdivide that pool by roles or departments. Sequence flows stay within a pool; interactions across participants are messages. If you want the canonical definition, the OMG BPMN 2.0 specification landing page provides the official terminology. You don’t need full BPMN to make effective swimlanes, but the concepts help you model handoffs more precisely.
When to use swimlanes:
- Your process spans multiple teams/roles and you need to show ownership
- You’re discovering handoff delays or unclear responsibilities
- You want an audit-friendly map that supports continuous improvement
Pro tip: Keep lanes scoped to durable responsibilities (e.g., “Sales,” “Finance”) rather than temporary individuals; you’ll update the diagram less often.
2) ProcessOn Basics: Pools, Lanes, and Shapes
ProcessOn makes swimlanes straightforward: create a diagram, drag in a pool, add lanes, and start mapping. The overall sequence—create a file, choose diagram type, and insert Pool/Lane from the graphics library—is covered in the ProcessOn beginner swimlane guide (2025) and the step-by-step ProcessOn swimlane tutorial (2025).
Key ideas before we start clicking:
- Pools and lanes: One pool can contain multiple lanes. Lanes are the horizontal bands you’ll label with roles.
- Flowchart shapes: Use standard shapes—terminator for start/end, rectangles for tasks, diamonds for decisions.
- Connectors: Arrows show the sequence of steps; crossing lanes indicates a handoff between roles.
3) Step-by-Step: Build Your Swimlane in ProcessOn
Follow these steps in a fresh ProcessOn file:
- Create your diagram
- From the ProcessOn home or Personal Files, select Create.
- Choose Flowchart or Swimlane Diagram. (Both options support lanes; the dedicated swimlane option opens with relevant shapes.) This is the typical entry path described in the ProcessOn beginner swimlane guide (2025).
- Insert a pool and add lanes
- In the left Graphics Library, open More Graphics and locate the Pool and Lane shapes.
- Drag a Pool onto the canvas.
- Drag Lane onto the Pool to add the first lane. Repeat to add more lanes. You can insert additional lanes between existing ones by dragging the Lane element to the desired position. The drag‑and‑drop approach is shown in the ProcessOn swimlane tutorial (2025).
- Label lanes by role/department
- Double‑click the lane title area to rename it (e.g., Sales, Finance, Support). Keep names short and stable.
- Adjust lane sizes
- Hover near lane boundaries until you see a resize handle; drag to set comfortable heights. Balance white space so text stays readable.
- Place standard flowchart shapes
- In the Basic Flowchart Shapes library, drag these core shapes:
- Terminator (Start/End)
- Process (Task)
- Decision (Diamond) for yes/no branching
- For a refresher on shapes and pacing, ProcessOn’s flowchart primer covers typical steps and sequencing in the flowchart how‑to (2025).
- Connect steps across lanes (handoffs)
- Use the connector tool or drag from a shape’s connection point to another shape.
- Crossing a lane boundary signals a handoff. If auto‑routing creates awkward paths, manually drag connector segments to add neat elbows and avoid overlaps.
- Keep everything tidy
- Select multiple shapes and use alignment/distribution to create even spacing. ProcessOn provides Arrange controls and smart alignment guides, as referenced in the ProcessOn getting‑started guide (2024) and the note on smart alignment in the Process flow diagram tutorial (2024).
- Style with intention
- Use color sparingly—e.g., a muted lane color and a consistent font size. Don’t use color as the only meaning signal; pair with labels for accessibility.
- Validate flow logic
- Read left‑to‑right through each path. Every decision diamond should have labeled outcomes. Every branch should rejoin or intentionally end.
What about vertical lanes? ProcessOn’s public materials emphasize horizontal lanes; an official toggle for vertical orientation is not documented. If you need a vertical layout, consider a template that already uses the orientation you want or structure columns manually.
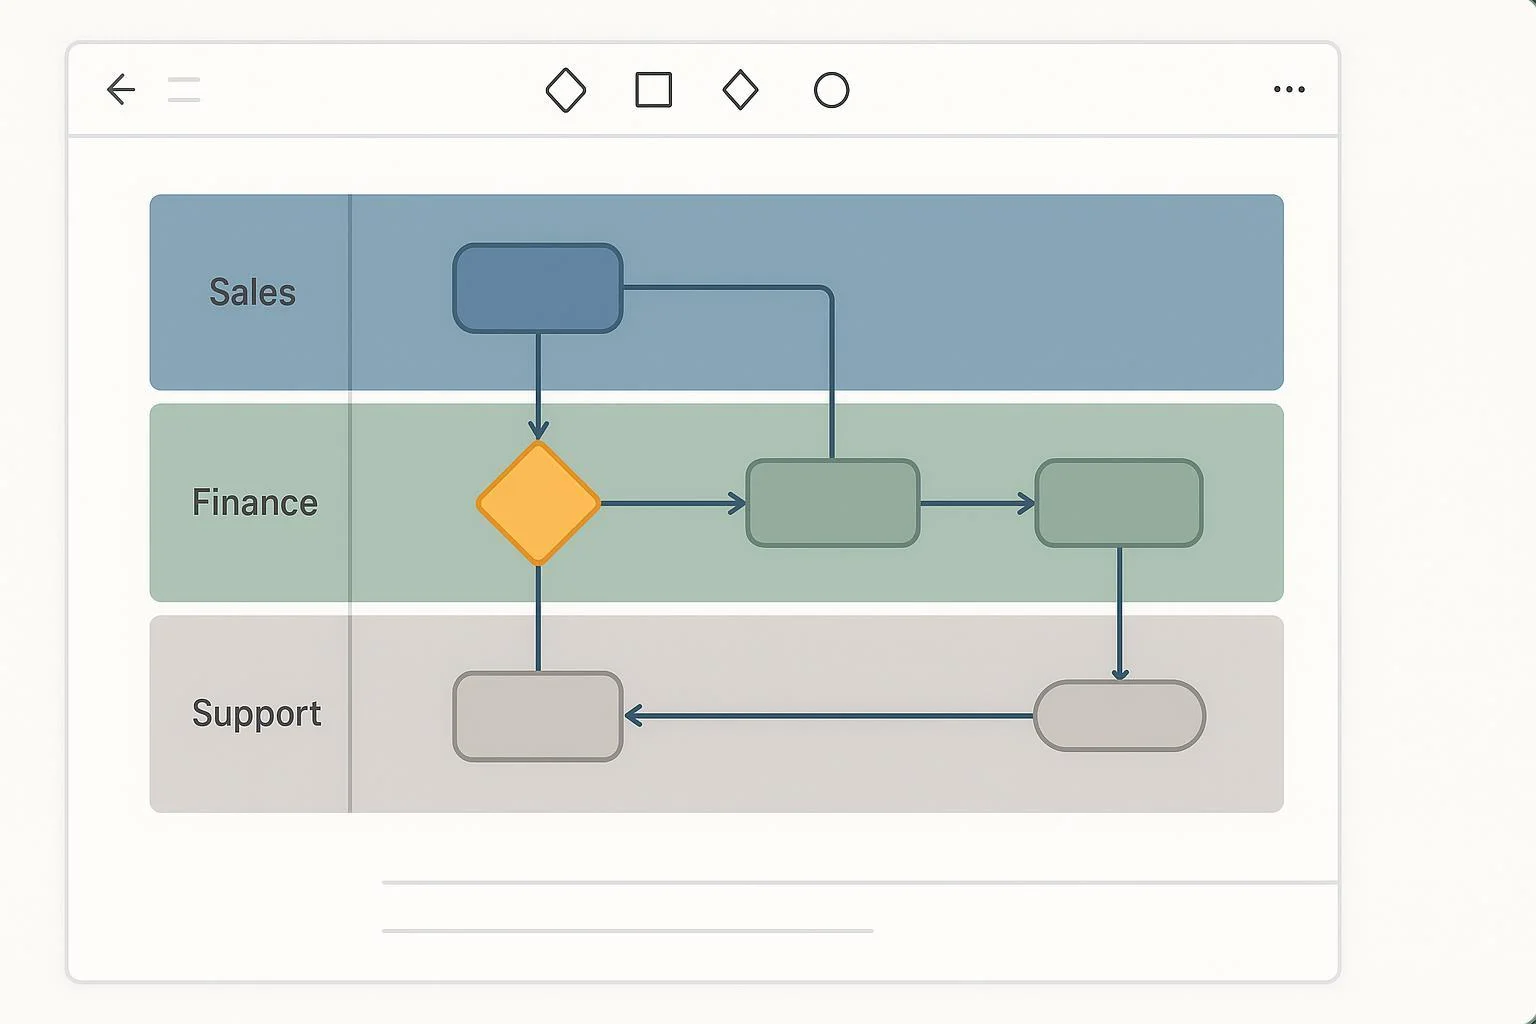
4) A Quick Walkthrough Example (Sales → Finance Handoff)
Let’s model a minimal cross-functional handoff to make the mechanics concrete.
Scenario: Sales confirms an order; Finance invoices the customer; Support is informed for onboarding.
- Lanes: Sales, Finance, Support
- Steps (shapes):
- Start (Terminator) in Sales: “Order confirmed”
- Task in Sales: “Prepare order packet”
- Connector crosses to Finance: handoff
- Task in Finance: “Generate invoice”
- Decision in Finance: “Credit approved?” → Yes / No
- If No: Task in Finance: “Request additional info”; connector loops back to Sales: “Provide info” → return to “Generate invoice”
- If Yes: Task in Finance: “Send invoice”
- Connector crosses to Support: “Notify onboarding”
- End (Terminator) in Support: “Onboarding scheduled”
Tidy‑up tips as you build this:
- Center shapes within each lane to reduce cross‑lane line crossings.
- Put the decision near the lane boundary to shorten connector lengths.
- Label the Yes/No paths directly on the connectors.
5) Collaborate, Share, and Govern Changes in ProcessOn
One big reason teams like ProcessOn is its real‑time collaboration—multiple people can edit and see updates instantly. The product pages highlight multi‑user online editing for diagrams such as flowcharts; see the note on collaborative editing on the ProcessOn Flowcharts page (accessed 2025).
Practical collaboration steps and guardrails:
Invite collaborators
- Use the Share options to invite by email or generate a link/QR. Official getting‑started materials describe link/QR sharing with password and expiration, and permission scopes such as view or edit; see the ProcessOn getting‑started guide (2024).
Choose permissions wisely
- Default to View for stakeholders who only need to review. Grant Edit only to the mapping group. If your workspace policies require passwords and expirations, set them on the share link.
Capture feedback
- If a dedicated comment tool isn’t visible in your editor, add “notes” on shapes or create a temporary “Feedback” lane for review items. Confirm your team’s preferred method in the app.
Use version history for safety
- Need to roll back after a messy workshop? Open File > History to browse and restore earlier versions, as referenced in the getting‑started guide (2024).
Governance tips:
- Name files consistently: Product‑Process v1.3 — 2025‑10‑Review.
- Record decisions in the diagram footer or a companion doc.
- Snapshot a PDF after each milestone review for your audit trail.
6) Export and Present Your Diagram Cleanly
When you’re done (or at a review checkpoint), export a clean copy for distribution:
Confirmed formats in ProcessOn
- PDF, PNG, and SVG are available according to ProcessOn’s how‑to posts. You’ll see guidance to “select the appropriate format (such as PDF, PNG)” in the flowchart how‑to (2025) and “export to PDF, PNG or SVG” in the sales flowchart tutorial (2025).
Which format should you pick?
- PDF: Best for print and sharing multi‑page or vector‑sharp outputs.
- SVG: Ideal for embedding in docs or slides where you may need to scale without losing clarity.
- PNG: Great for quick sharing in chat or email; pick a sufficiently large canvas to avoid pixelation.
Page and margin considerations
- If your export dialog doesn’t expose DPI or margin options (not documented in public materials), rely on PDF/SVG for fidelity and adjust framing in your presentation tool (e.g., add margins in the slide).
Accessibility for presentations
- Ensure text is legible at the expected display size.
- Don’t rely on color alone—use labels, patterns, or icons.
- Maintain good color contrast for key elements.
7) Advanced Techniques and Power‑User Patterns
Use these patterns when your swimlane grows beyond the basics.
Phase separators inside a pool
- Break long processes into stages (e.g., Intake, Approval, Fulfillment). ProcessOn’s swimlane templates mention pool/lane/separator elements; browse examples on the ProcessOn swimlane templates page (accessed 2025).
Parallel paths and synchronization
- When two tasks happen in parallel, show a split from a prior step and later rejoin before the next step. Label both parallel tasks clearly; keep connectors short and uncluttered.
Conditional routing
- Use decision diamonds with explicit connector labels (Yes/No, >$10k, Priority=High). Place decisions near lane boundaries to shorten crossing lines.
“BPMN‑lite” alignment
- If your audience knows BPMN, borrow the ideas of pools/lanes and explicit message flows between independent participants, but keep the notation simple. For formal definitions, the OMG BPMN 2.0 spec landing page remains the authority.
Layout acceleration
- Leverage smart alignment cues and Arrange → Align/Distribute to keep grids neat; the presence of alignment assistance is mentioned in the Process flow diagram tutorial (2024) and general Arrange usage in the getting‑started guide (2024).
8) Quality Assurance: A Practical Review Checklist
Before you share your swimlane, do a quick pass with this checklist:
- Ownership clarity
- Are lane labels concise and durable (roles, not people)?
- Are cross‑lane handoffs obvious and minimal?
- Flow correctness
- Does each path have a clear start and end?
- Are all decision outcomes labeled and resolved (rejoin or end)?
- Readability
- Consistent font sizes and shape spacing
- Lines don’t overlap labels; elbows keep routes clear
- Color used sparingly and paired with text labels
- Scope discipline
- 3–7 lanes is usually manageable; split very large processes into phases or separate diagrams.
- Stakeholder validation
- Walk through the diagram with role owners; capture changes in version history.
For background on the benefits of clarity and handoff visibility, see the short conceptual recap in the Atlassian swimlane overview (2025).
9) Troubleshooting: Fast Fixes for Common Issues
Connectors cross and tangle
- Shorten routes by moving shapes closer to lane boundaries where handoffs occur.
- Add elbow waypoints and avoid diagonals when possible.
- Use Arrange → Align/Distribute to re‑grid cluttered areas.
Lane heights feel cramped
- Increase lane height and nudge shapes to maintain even top/bottom margins.
- If text wraps awkwardly, shorten step names to verb‑noun phrases.
Decision logic isn’t obvious
- Move the diamond closer to the branching point; label connectors near the diamond.
- Ensure each branch rejoins intentionally or ends with a terminator.
Diagram is getting too big
- Introduce phase separators or split the diagram by major stage.
- Extract detail into a subprocess diagram and link to it from a single “Do X subprocess” step.
Export looks blurry
- Prefer PDF or SVG for crisp lines. If you must use PNG, increase the canvas size before exporting.
Someone overwrote changes
- Open File > History to restore a prior version. Consider restricting Edit access and using View links for reviewers. UI references for history and sharing are covered in the getting‑started guide (2024).
Can I make vertical lanes?
- An official vertical‑lane toggle isn’t documented in public posts. Consider starting from a vertical template if you find one, or model columns manually.
Where are comments?
- If a specific “comment” tool isn’t visible in your editor, use notes or a temporary “Feedback” lane. Align on feedback etiquette with your team.
10) Switching From Other Tools (Quick Orientation)
- From Visio or Lucidchart: Pools/lanes and connectors work similarly. What’s different is how ProcessOn handles sharing (link/QR/password options) and web‑native collaboration.
- From Miro: You’ll gain more formal flowcharting primitives and alignment tools suitable for precise handoff mapping; use Arrange and smart alignment for crisp layouts.
- From Canva or diagram‑lite tools: ProcessOn offers richer diagram semantics (pools/lanes, separators) and version history that help with governance.
Keep in mind that this guide focuses on ProcessOn; templates and features in other tools may differ.
11) Mini‑Glossary (for quick reference)
- Pool: A major participant in a process (e.g., a company or system). Contains lanes.
- Lane: A horizontal band representing a role or department inside a pool.
- Handoff: A connector that crosses from one lane to another, signaling responsibility transfer.
- Parallel paths: Two or more activities that occur simultaneously before converging.
- Separator: A visual divider marking phases or stages within a pool.
12) Your First 30 Minutes, Scripted
If you want a time‑boxed plan for your first swimlane in ProcessOn, try this:
- Minutes 0–5: Create the file; insert a Pool; add 3–4 lanes; label them.
- Minutes 5–15: Place Start/End, 6–10 task rectangles, and 1–2 decision diamonds. Connect steps, label decision branches.
- Minutes 15–20: Tidy with Align/Distribute. Adjust lane heights. Apply minimal color.
- Minutes 20–25: Add phase separators if needed. Sanity‑check the flow; remove duplicates.
- Minutes 25–30: Share a View link with stakeholders. Export a PDF snapshot for your notes.
13) References and Further Reading
- Swimlane “what and why” refresher: Atlassian swimlane overview (2025)
- Pools/lanes concept origin: OMG BPMN 2.0 specification (landing page)
- ProcessOn how‑tos and product notes:
- ProcessOn beginner swimlane guide (2025)
- ProcessOn swimlane tutorial (2025)
- ProcessOn flowchart how‑to (2025): export basics
- ProcessOn sales flowchart tutorial (2025): PDF/PNG/SVG export
- ProcessOn flowcharts page (accessed 2025): collaboration
- ProcessOn getting‑started guide (2024): share, Arrange, history
- Process flow diagram tutorial (2024): smart alignment cues
- ProcessOn swimlane templates landing (accessed 2025)
With these steps and patterns, you’ll build swimlanes that are easy to read, easy to maintain, and easy to trust—exactly what teams need when processes cross functions.