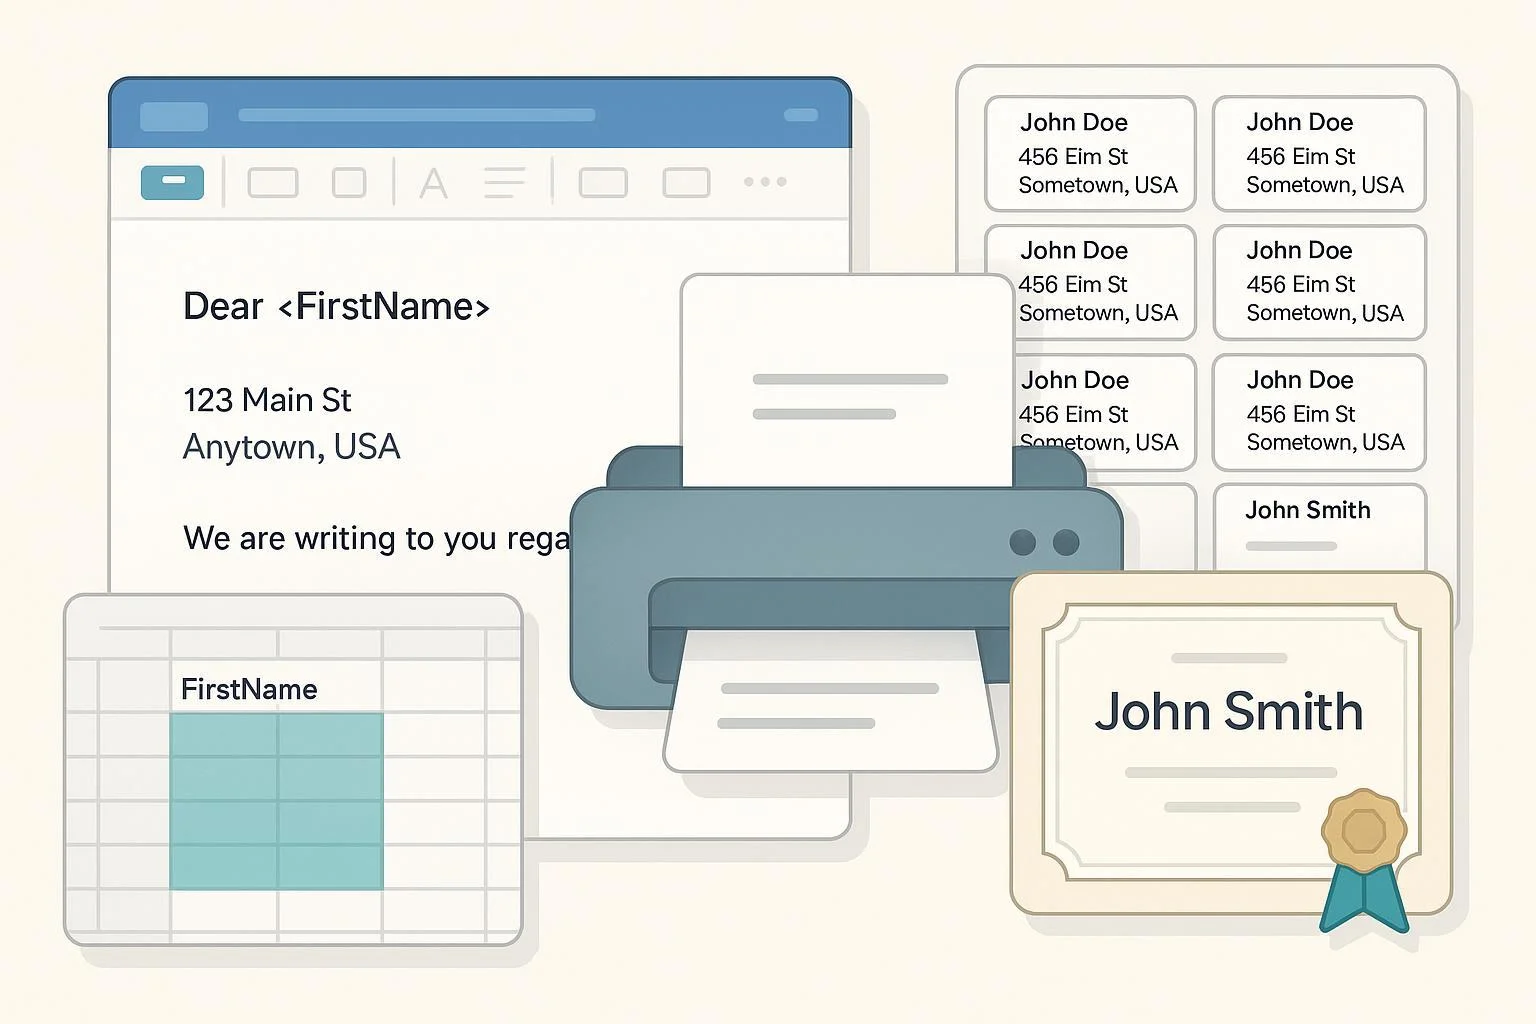
Get from a spreadsheet to personalized letters, perfectly aligned address labels, and professional certificates—fast. This guide walks you through WPS Writer mail merge from setup to output, with checkpoints, formatting tips, and troubleshooting so you can finish in one sitting.
- Difficulty: Beginner → Intermediate
- Time you’ll need (typical):
- Prepare data: 10–20 minutes
- Letters: 10–15 minutes
- Labels (with alignment test): 20–40 minutes
- Certificates (template-based): 20–45 minutes
- You’ll use: WPS Writer (desktop), an Excel/CSV list, and optionally a printer or PDF export.
Note on interface labels: Depending on your WPS build, Mail Merge tools may appear on the Mailings tab or the References tab. Both routes are shown below, in line with the workflows described in the WPS Academy step-by-step tutorial and recent WPS blog posts.
According to the WPS Academy quick tutorial (2024+ era UI), you can start from the References tab and choose Mail Merge, connect a data source, insert merge fields, preview, and finish the merge, which matches what the WPS blog explains when starting from the Mailings tab in its guide on how to mail merge from Excel in WPS Office. For exporting your merged output to PDF, WPS provides a dedicated walkthrough on mail merge to PDF.
1) Prepare your data (Excel or CSV)
Do this once, and every merge will be easier and cleaner.
- Create a single header row. Example: FirstName, LastName, Address1, City, State, ZIP, Course, Date, Amount.
- Keep one record per row; avoid blank header cells and merged cells.
- Use consistent data types per column (don’t mix numbers and text).
- Remove leading/trailing spaces in headers and key fields.
- Prefer Excel (.xlsx/.xls/.et). If the connection is flaky, save a copy as CSV and use that for the merge.
Quick self-check
- Can you filter/sort each column without errors?
- Do header names match exactly what you plan to insert (no hidden spaces or extra punctuation)?
Why this matters: Clean headers let you insert the right fields instantly; consistent types prevent odd formatting (like ZIP codes dropping leading zeros).
Sources for the core workflow include the WPS Academy’s step-by-step overview in its guide on how to mail merge in WPS Office and the WPS blog’s practical tutorial on mail merge from Excel.
2) Letters: the baseline mail merge
Outcome: A batch of personalized letters, each record turned into its own page.
Steps
- Open a new or existing letter in WPS Writer.
- Start Mail Merge:
- Mailings tab → Start Mail Merge → Step-by-Step Mail Merge Wizard (if shown), or
- References tab → Mail Merge.
- Connect your recipients:
- Choose Open Data Source → select your Excel/CSV → pick the correct worksheet (if Excel).
- Confirm the recipient list appears.
- Insert merge fields:
- Click where you want a field, then Insert Merge Field → select a field (e.g., FirstName, Address1).
- Build your address block and greeting line (for example: Dear «FirstName»,).
- Preview results:
- Use Preview/Next Record controls to check several random entries.
- Finish & output:
- Finish & Merge → To a new document (review and save), or
- Finish & Merge → Print (for immediate printing).
- To create PDFs, either export the merged document to PDF or Print → choose a PDF printer; see WPS’s guide on mail merge to PDF.
Checkpoints
- Are names and addresses mapping correctly? If not, reconnect the data source and re-insert the fields.
- Spot-check 3–5 records to catch typos or formatting issues.
3) Address labels: table-based method for precise alignment
Outcome: A full sheet of address labels that line up with your physical label stock.
Because WPS Writer doesn’t document a one-click “Update Labels” feature, you’ll set up a table that matches your label sheet and replicate the first label across the page. The WPS blog’s label walkthrough shows the table approach for creating labels in WPS; see its guide on creating labels using WPS Office.
Before you start
- Have the label sheet specs ready: page size, margins, number of rows/columns, label width/height, spacing.
Steps
- Create a new WPS Writer document.
- Page setup:
- Page Layout → Size → match your sheet (e.g., Letter 8.5"×11").
- Page Layout → Margins → set margins per the label sheet.
- Insert the label grid:
- Insert → Table → set rows/columns to match the sheet.
- Right-click the table → Table Properties → set exact cell width/height to the label dimensions.
- Set cell margins to suit your sheet; remove cell spacing if needed.
- Start Mail Merge:
- Mailings or References tab → Mail Merge → Open Data Source → choose Excel/CSV.
- Compose the first label (first cell only):
- Type the layout you want, e.g.,
«FirstName» «LastName»
«Address1»
«City», «State» «ZIP» - Apply fonts/size/line spacing you want across the sheet.
- Type the layout you want, e.g.,
- Replicate across all labels:
- Select the entire content of the first cell and copy.
- Paste into each remaining cell.
- Preview & test print:
- Use Preview to flip through several records.
- Print one page on plain paper. Hold it over your label sheet against a window or light to check alignment.
- If off, adjust table cell sizes/margins slightly and re-test. Ensure printer scaling is 100% (no “Fit to page”).
- Final print:
- When alignment is perfect, print onto the label sheets.
Pro tips
- Keep text away from cell edges; home printers can shift a millimeter or two.
- If columns wrap or clip, reduce font size or line spacing by small increments.
4) Certificates: personalize a template with merge fields
Outcome: A polished set of certificates with individualized names, course info, and dates.
Setup notes
- Use text boxes and shapes for precise placement. Install all fonts you plan to use.
- Columns you’ll likely need: FullName (or First/Last), Course/Program, CompletionDate, optional Instructor.
Steps
- Open your certificate template in WPS Writer (or design one: Insert → Shapes/Text Box, add your logo as a static image).
- Start Mail Merge and connect your Excel/CSV data.
- Click inside each text box where personalization belongs and Insert Merge Field (e.g., «FullName», «Course», «CompletionDate»).
- Preview several records:
- Check long names; widen text boxes or reduce font size if any overflow.
- Confirm alignment and spacing on actual page size.
- Finish & output:
- Merge to a new document → sanity-check a few pages.
- Export to PDF for easy distribution or professional printing (see WPS’s mail merge to PDF).
Important constraints
- Dynamic per-recipient photos/signatures via merge fields are not documented in WPS Writer. Use a static background/logo and merge only text. If images are mandatory, add them manually post-merge or consider a specialized tool.
5) Formatting control: dates, currency, and ZIP codes
Safest approach (works in all builds): format in the source data
- Dates: In Excel, create a helper column using TEXT, e.g., =TEXT(A2, "mm/dd/yyyy"). Merge that column.
- Currency: Use a helper column for a pre-formatted string, e.g., =TEXT(B2, "$#,##0.00").
- ZIP codes: Store as Text so leading zeros are preserved (e.g., 02115).
Optional (feature support varies by WPS build): Word-style field switches
- If your WPS Writer build supports Word-like field switches, you can format in the merge field, e.g., { MERGEFIELD CompletionDate @ "MM/dd/yyyy" } or { MERGEFIELD Amount # "$#,##0.00" }.
- Because WPS does not publish a definitive reference for these switches, verify on a small test. Patterns commonly documented for Word are summarized in the Ablebits guide on mail merge formatting switches. If your output doesn’t reflect the switch, revert to the source-formatting method above.
Editing/toggling fields
- If you need to edit a field, select it and re-insert via Insert Merge Field. Global “toggle field codes” shortcuts are not consistently documented for WPS; stick to per-field edits where needed.
6) Common problems and quick fixes
Data source won’t connect or list is empty
- Close the Excel file elsewhere and reconnect.
- Save a copy as CSV, then Open Data Source → CSV.
- If your Excel file has multiple sheets, confirm you selected the right worksheet during connection.
Fields show wrong or blank data
- Re-check exact header names (no extra spaces). Re-insert the fields.
- Confirm the active sheet actually contains the data.
- Ensure there’s only one header row and no merged cells.
Dates/currency don’t look right
- Use helper columns with TEXT() in Excel and merge those columns.
- If your build appears to support field switches, apply and test; otherwise stick to source formatting.
Labels don’t align with the sheet
- Print a single test page on plain paper first.
- Turn off printer scaling (“Fit to page,” “Shrink to printable area”). Use 100% scaling.
- Tweak table cell width/height or page margins in small increments (0.5–1.0 mm) and re-test.
Certificates overflow or wrap oddly
- Widen the text boxes and reduce font size by small steps.
- Avoid fonts with large x-height if space is tight.
Can’t find Mail Merge features
- Check both the Mailings tab and the References tab; WPS places these tools differently across builds. The WPS Academy’s tutorial on how to mail merge in WPS Office demonstrates the References route; the WPS blog on mail merge from Excel shows the Mailings route.
7) Verification checklist (before you print or send)
- Preview at least 5 random records (first, middle, last; plus two randoms).
- For labels: print one test page on plain paper and check alignment against the label sheet.
- Confirm date and currency formats on multiple records.
- Spot-check 3–5 recipients against the source spreadsheet.
- Save the merged output as a new document before printing; also export a PDF if you’ll share digitally.
References and further reading
- WPS Academy — succinct walkthrough of the WPS mail merge flow in its guide on how to mail merge using WPS Office
- WPS Blog — step-by-step on mail merge from Excel in WPS Office
- WPS Blog — label creation using tables in WPS: how to create labels in WPS Office
- WPS Blog — exporting merged documents to PDF: mail merge PDF from Excel
- Field switches background (Word-style patterns; verify in your WPS build): Ablebits overview of mail merge formatting switches